The Broncolor Siros 400 L and exploring the exposure triangle in reference to High-Speed Sync!
Broncolor Siros L, getting studio power when there is no power... plus I ramble about the exposure triangle!
The 'L' stands for, "Loh my god, these work like magic".. or something. In fact, I was just about to write that the wall powered versions are called the Broncolor Siros S, and that I have no idea why, and then my only two functioning brain cells decided to rub together and suggest that it's probably referencing that 'S' stands for 'studio', as it can be plugged in, and the 'L' is for 'location', as they're battery powered, so you don't need any external power source. We'll pretend that's a fact, even if it isn't, and that I didn't assume this.
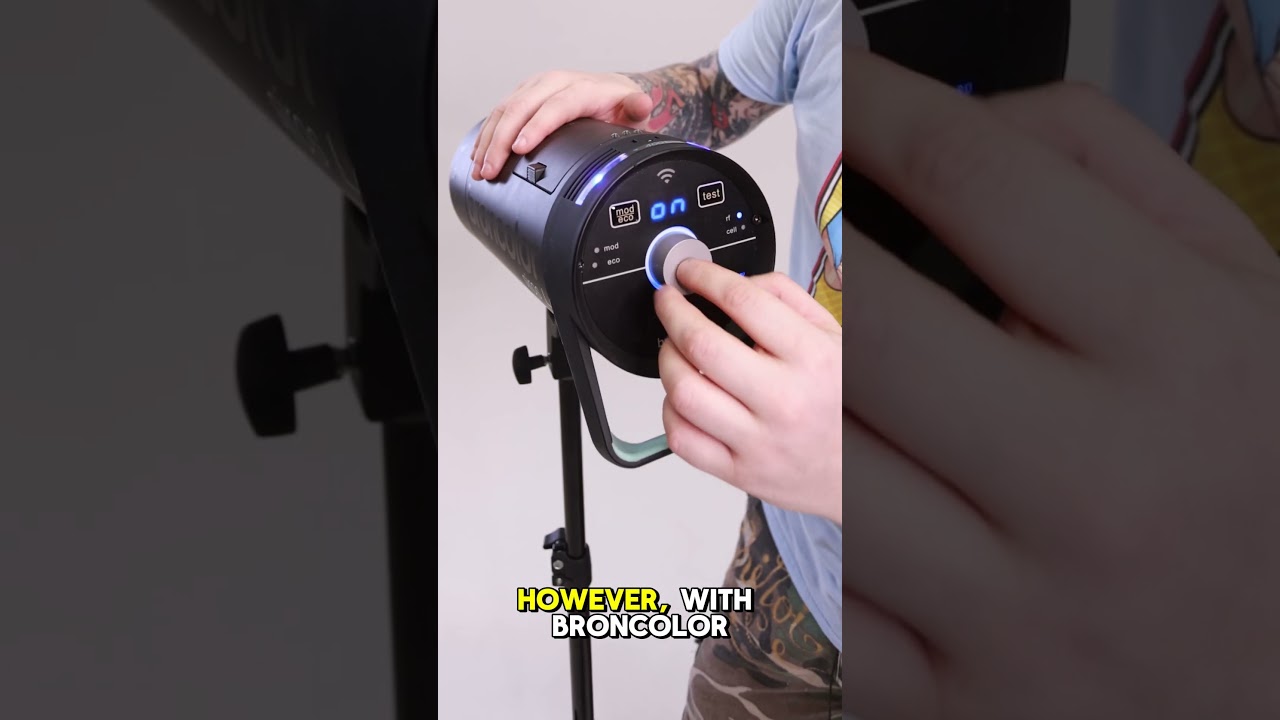
Now these strobes are a step up from the previous ones we've talked about - they go well beyond the basics. In fact, they’re so feature-packed that I’ve not even explored everything they can do myself, yet. I originally bought them with our pool location here at Splash Point Photo in mind, but also for the flexibility of shooting outdoors without needing a power source. And on top of that, they give me the option to battle bright sunlight using high-speed sync - something that's definitely handy when you're working outside.
Click here to see the Broncolor Siros L specs.
Before I get in to High-Speed Sync, if you wish to have a quick read about the limitations of normal sync speeds between your camera's shutter and strobe lights, then you can have a nosey here on our website, where I've already briefly covered it.
High-speed sync (HSS, for short) allows you a way around those limitations. It’s a feature found in certain lights - usually those that are more advanced and expensive. It lets you shoot at shutter speeds beyond your camera’s typical flash sync limit.
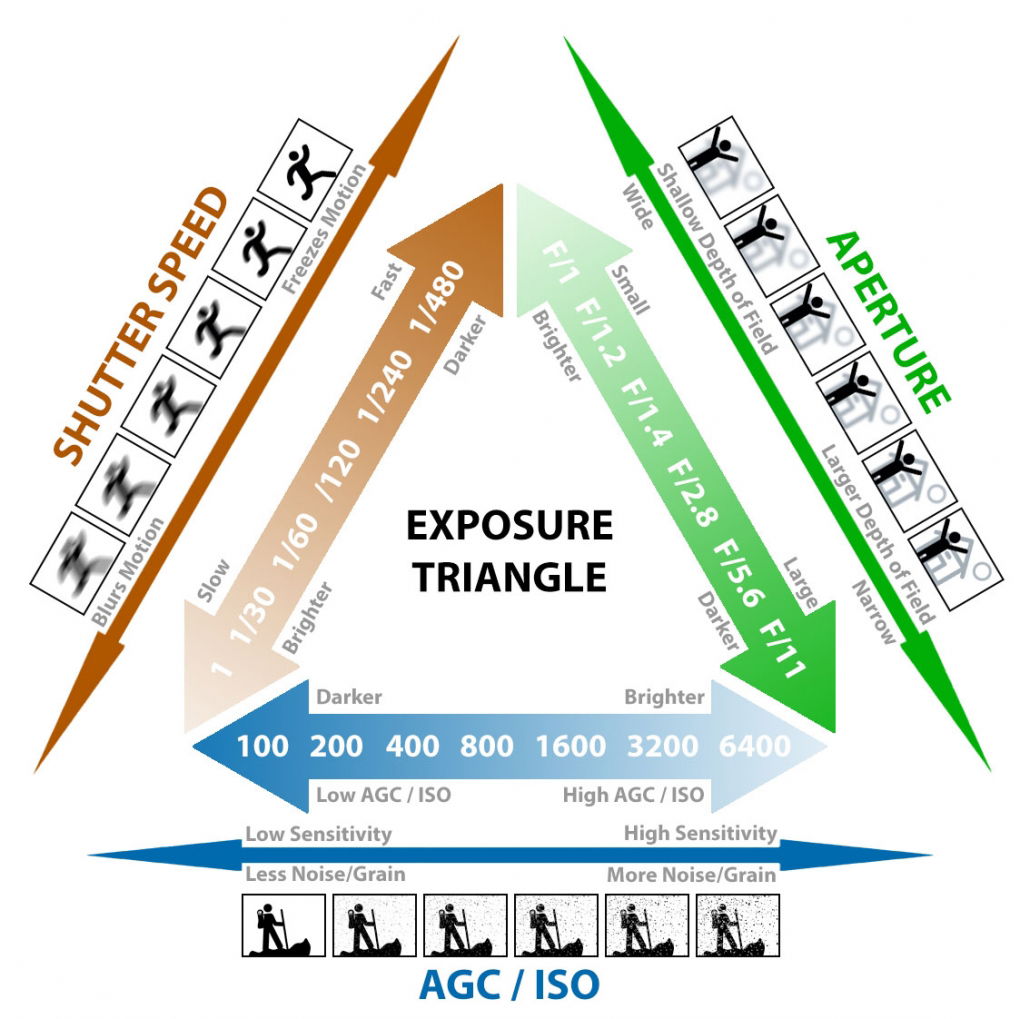
So why is that helpful in bright sunlight? Because shutter speed is the only part of the exposure triangle that doesn't affect the output of a strobe light. Both the ISO and aperture (f-stop) will affect your flash exposure, making it brighter or darker. Raising the ISO makes your sensor more sensitive to light, and aperture allows more (or less) light in depending on it's size. However, because flash durations are so short, the shutter speed only affects ambient light - such as the sun.
With HSS, you can increase your shutter speed to darken the background (ambient light) while still lighting your subject with a flash. That said, there’s a trade-off. HSS works by pulsing the flash rapidly during the exposure rather than firing just once at full power, which usually results in a bit of a loss in output power. I’ll likely revisit shutter speed in more detail when we get into triggers and receivers (how your camera actually fires the lights), and who knows, if this 101 series goes far enough, we might properly dive into HSS too!
The Exposure Triangle
If you’re new to photography, or are maybe mostly self-taught, some of the terms I just mentioned might have gone over your head. And that’s totally okay! I don’t want anyone feeling lost here, so let’s take a moment to break things down… or at least give it a shot without making it more confusing.. so fingers crossed!
I’ll be honest - I recommend getting comfortable with your exposure triangle (and shooting Manual) long before you even step into a studio, and definitely before using fancy gear like Broncolor. But it’s important, so here goes!
Your exposure triangle is basically the creative control you have over how an image is exposed. When you shoot in manual mode, you’re the one calling the shots instead of the camera’s automatic settings. The exposure triangle refers to the three key settings: ISO, shutter speed, and aperture. You’ll need to adjust these to capture your photo exactly how you want it - or simply to get the exposure 'right'. For example, imagine you’ve nailed the perfect shot at ISO 100, f/10, and with a 1/160 shutter speed. Now, lets say you want a shallower depth of field to get that a more blurry background effect, so you open up your aperture to f/4. While it'll give you more blur, it also opens up the hole in the lens, the aperture, in which light passes through. So since lowering the f-stop lets in more light, your photo will now become way overexposed if you don’t tweak one of the other two settings to balance it out.
In this scenario, you don't have a lens filter that blocks light out (you can get them), so the only way to reduce light in to your camera sensor would be to lower your ISO or raise your shutter speed. Many cameras don't go down to ISO50, not that that would help much anyway, as you're already nearly as low as you can go at ISO100, even if it did. That leaves you with adjusting the shutter speed alone (a faster shutter is open less time, so it lets less light in) and as a result, you are hugely limited by the practicality and physics of it all. To take that same shot, with the same exposure, but also with your new depth of field, you'll have to compensate by pushing your shutter speed up to 1/1000. Your, again, now correctly exposed new shot settings will read ISO100, f4 and 1/1000, yet nothing has changed in terms of exposure other than your creative choices.
Sooo, if you then did then introduce a flash whose sync speed caps out at say 1/160th like most standard strobe lights do, that's when you'd need HSS, and being able to expand your shutter sync speed to 1/1000.
Remember, though, sometimes that shot you really want, you just can't get it, and it actually IS the equipment and not you.. kinda! As with every industry though, there's usually an expensive advancement in tech to try and tackle the limitations, like a fancy light that has HSS, or a stop down lens filter - of which all of this brings me tediously back to the Broncolors and the reason I bought them and wrote this blog!
We're all just slaves to the mistress that is physics. Outside of creativity, a photographer is merely a problem solver that understands both the limitations of physics and their available tools to tackle it.
This is why both expensive lighting and a camera will do you no good if you can't use it - so tell that to people the next time they tell you that your fancy camera must be amazing at taking photos! And even then, let's face it, it's probably more the lens and your decision-making, as a good camera just aids that process with simplicity and convenience, while advancements in camera technology will just improve sensor quality and camera's software at delivering what you ask of it.
If you do want to get serious about photography, I implore you to stop allowing your camera to make decisions for you, and instead, you should aim to shoot in manual! Not least, because in your average studio, you'll have to! If you're shooting events and in fast-paced environments (especially where lighting conditions change rapidly or say sport, where the shutter speed is a priority) where capturing something 'close enough' is better than forgetting that you've not changed your exposure, or if you can't get the right exposure dialled in in time so you are missing the action, then by all means use a priority mode; it's an invaluable tool too. Every tool has its place!
Having said all that, mirrorless cameras have massively changed the playing field with their inbuilt 'exposure simulator' (Canon terminology) too, as it allows you to see the real time exposure through the viewfinder or LCD (assuming you're not using any flash), so you can make creative choices in real time.. and in manual.. and all while being pretty confident of the results. If, like me, you insisted on shooting mostly in manual anyway, on a (d)SLR, you'd be keeping one eye on your in camera light meter and trying to understand how it's reading the scene so you can change settings on the fly to get it 'close enough' for RAW (file type retaining the most data, quality and ability to change basic settings on the computer after). When using a priority mode, you still need to account for how your camera light meter reads the scene, and then adjust the exposure compensation accordingly, so you don't gain much outside of speed, and that in turn probably enables complacency in you, so unless the lighting conditions are so rapidly changing that you can't keep up, then manual is the way to go!

Do you want a foolproof way to change your triangle on the fly for creativity but still being able to keep correct exposures?
Well.. I realised this way later than I should! It was a eureka moment if you will, and yet brutally obvious, but also easy to overlook and not think about too. The shutter dial and aperture pin wheel rotational clicks (on a Canon at least) are in thirds of a stop, so if you need to change quickly, all you need to do is know where those settings are on your camera and count your clicks. That's it! For every click in one direction on one, you just need to click in the relevant direction on either of your other adjacent exposure triangle settings. More hobbyist priced cameras may have one of these setting in a button sub-menu rather than on a wheel, and that's where a good camera really does matter!
Even on pro level dSLR cameras, the ISO is often in a menu or on a top panel with other buttons way too close as your prod at it, and because I shot a lot of low light live music where I may adjust the ISO more than in any other photography scenario, I set mine up to not be. You can set custom buttons via the menus, so now I can hold down the 'set' button in the middle of the pin wheel, and use it like a shift key, and then I use my shutter dial to change my ISO too. It's something I set up on every camera I own. Having compete on the fly access to my whole exposure triangle with absolute certainty, is a game changer. Modern camera touch screens are nice in a slow paced environment like a studio, but they're not gonna get you to where you need to be if you have to be efficiently quick.
Anyways, this click system is as easy as counting, and takes all the confusing jargon out of it that has probably just made your eyes glaze over. You don't need to know what a car engine is doing when you press the accelerator, just that that action works, in much the same way that you don't need to know the 'exposure triangle' and every f.stop increment number, just that every click should have an adjacent one. All you need to remember is that the ISO number goes up for more light, whereas both the shutter speed and F.stop number comes down.. and of course vice versa. every click that moves that f.stop from f10, must be compensated with a click in the opposite direction on either the ISO or shutter speed - just count the clicks!